Feb 24, 2012

Tuna Salad

Today I made my tuna salad a little different.. Yesterday's was the classic kind with mayo in a sandwich, but today I used the following:

- Boston Lettuce
- Cucumber
- Can of good tuna
- Pine Nuts
- Olive Oil
- Balsamic Vinegar
- Salt and Pepper to taste

Mix everything (except Pine Nuts) in a bowl and break apart your tuna either with a fork or by hand.
Garnish with Pine Nuts and enjoy!

Happy Eating! <3

Feb 23, 2012

question...

Do you guys like that I show you "steps" of things I do, or do you prefer a pic of the finished product? 

Liver & Onions

Now I know that most of you are like "Ew..." and are probably gonna quickly go to the next website in your list, but hear me out! I PROMISE that this recipe will leave you with the most tender and delicious liver that tastes more like chicken fried steak then liver...I also realize that my photo may not make it look as appetizing as it actually is...cut me some slack though, k?


-------------------------------------------------------------------------------------------

Ingredients

  • 2 pounds sliced beef or calfs liver
  • 1 1/2 cups milk, or as needed
  • 1/4 cup butter, divided
  • 2 large Vidalia onions, sliced into rings
  • 2 cups all-purpose flour, or as needed
  • salt and pepper to taste

Directions

  1. Gently rinse liver slices under cold water, and place in a resealable bag. Pour in enough milk to cover. Let stand while preparing onions. (I like to soak up to an hour or two - whatever you have time for.) This step is SO important in taking the bitter taste of the liver out.
  2. Melt 2 tablespoons of butter in a large skillet over medium low heat. Separate onion rings, and saute them in butter until soft and golden. Remove onions, and melt remaining butter in the skillet. Season the flour with salt and pepper, and put it in a shallow dish or on a plate. Drain milk from liver, and coat slices in the flour mixture.
  3. When the butter has melted, turn the heat up to medium-high, and place the coated liver slices in the pan. Cook until nice and brown on the bottom. Turn, and cook on the other side until browned. Add onions, and reduce heat to medium. Cook a bit longer to taste. 

*Mina's Suggestions/Notes*

- If you have it, i like to add additional spicing to the flour mixture like garlic powder and paprika. 
- When you are caramelizing onions, think low and slow...like a good grilled cheese sandwich!
- Make sure to put your resealable bag in a bowl while its soaking because the last thing you need is a leak with liver milk dripping everywhere...at least it'll catch in a bowl, right?


Happy Eating! <3

Lunch Time!

You just can't have a sandwich without pickles and potato chips...
My sandwich is tuna and my chips today are Creamy Dill Pickle by President's Choice
Happy Eating! <3

Honey Lemon Chicken Breasts (Frozen)

I dont often cook stuff like this because I always end up disappointed. But I will occasionally buy a box because lets face it, we're not always in the mood to cook up a fancy meal from scratch.


This was my first time trying this product and I fell in love at first bite. Tastes nothing like I expected. I was expecting overly sweet with a strangely non honey lingering after taste. But this wasn't the case. These exploded with deeply marinaded honey lemon flavoring that wasn't over powering at all!

President's Choice Blue Menu Honey Lemon Chicken Breasts - Skinless, Boneless, fillets removed, and delicious!! (ok I added the last part...but they should include it on the box) ($9.99 for 5 Breasts)


This product is only available in Canada at Loblaw's and Super Stores...if one of these isn't already your main super market, I highly recommend that you stop at one for your next shopping trip and pick up a box. If I remember correctly, I paid $9.99 and it comes with 5 chicken breasts that are all pretty consistent in size.

(Sorry this is side ways, i wish I knew how to rotate the image) 

LOVE these and I'll definitely be purchasing them again!

*Mina's Suggestions/Notes*

- The cooking directions don't include an oven method but I cooked them from frozen on a baking sheet (lined with aluminum foil - trust me, you're gonna need it) :

Oven set to 375F (190C). Cook for 45 minutes turning once at 30 minutes. At the 30 minute mark I turned up the heat to 400F and continued cooking to get them caramelized. You'll already notice some liquid around the chicken breasts which will start to burn when cooked at 400F. Don't Worry! You're not burning the chicken, nor should it stick to the foil. At about 45 minutes they should look like mine in the first image :) 

Enjoy with some sort of side dish of your choice. Rice, scalloped potatoes, vegetable (I chose fresh asparagus boiled for 5 minutes), salad, anything really...i don't need to tell you this ;) 


Happy Eating! <3


Feb 22, 2012

Beet Salad

I'm actually pretty new to beets and had my first experience with them at a restaurant where they served them with crispy chorizo...I liked the beets but not the chorizo. I happen to own quite a few cook books and this is the original recipe from the book 400 Three & Four Ingredient Recipes. Of course, I'll explain my own modifications for my personal taste as well as any other notes I feel I should add :)


-------------------------------------------------------------------

Ingredients


4-6 cooked beets
1-2 tbsp balsamic vinegar
1 bunch fresh mint, thinly shredded
2 tbsp olive oil
salt & pepper to taste


Directions


1. Slice the beet or cut into even-size dice with a sharp knife.  Put the beet into a bowl and add the balsamic vinegar, olive oil and a pinch of salt and toss together to combine. 
2. Add half the thinly sliced fresh mint to the salad and toss lightly until thoroughly combined. Place the salad in the refrigerator and chill for about 1 hour. Serve garnished with the remaining thinly shredded mint leaves. 


*Mina's Suggestions/Notes*


- 4-6 beets is a LOT if you're making this for 2 people. I personally find that if you choose to make just a beet salad, no additional vegetables 3 is enough. 

- To cook the beets, wash them and leave the skin on.


 Boil them for what feels like forever. And by forever, I mean minimum 30 minutes. Similar to cooking a sweet potato.

Once you can stick a fork in them comfortably they're done. I suggest running them under cold water for a few minutes like you would a hard boiled egg to cool them down faster so they're more comfortable to handle. To remove the skin either use a paring knife or rub the skin off with a paper towel after cutting off the head of the beetroot.

(I forgot to take a photo of this step)

- I personally like to add other vegetables and such to my beets only because I feel I don't eat enough fresh vegetables or protein. This particular time making this salad I added cucumbers and tofu. But again, these aren't needed to make the salad..Other tasty vegetable additions could be shredded carrots, on a bed of boston lettuce, anything really..


- I also choose not to add the balsamic vinegar unless I'm actually craving that taste..but usually, I just dress it loads of my good olive oil. 


Happy Eating! <3

Feb 21, 2012

Test

Testing out blogging from my blackberry...

This is the after math of my left over Chicken Cacciatore...it was terrible ;)

Happy Eating! <3

Chicken Cacciatore

I made this recipe last night for the first time and was pleasantly surprised at how easy it is! It's a little bit similar to my Braised Duck Ragu because it's another kind of braised foul in tomato sauce, but it's less work and equally tasty!
This particular recipe I found on All Recipes.com except I immediately tweaked it for my preferences. Just check out my notes on the bottom to see the changes I made :)

*Source*
-----------------------------------------------------------------

Ingredients

  • 2 cups all-purpose flour for coating
  • 1/2 teaspoon salt
  • 1/4 teaspoon ground black pepper
  • 1 (4 pound) chicken, cut into pieces
  • 2 tablespoons vegetable oil
  • 1 onion, chopped
  • 2 cloves garlic, minced
  • 1 green bell pepper, chopped
  • 1 (14.5 ounce) can diced tomatoes
  • 1/2 teaspoon dried oregano
  • 1/2 cup white wine
  • 2 cups fresh mushrooms, quartered
  • salt and pepper to taste

Directions

  1. Combine the flour, salt and pepper in a plastic bag. Shake the chicken pieces in flour until coated. Heat the oil in a large skillet (one that has a cover/lid). Fry the chicken pieces until they are browned on both sides. Remove from skillet.
  2. Add the onion, garlic and bell pepper to the skillet and saute until the onion is slightly browned. Return the chicken to the skillet and add the tomatoes, oregano and wine. Cover and simmer for 30 minutes over medium low heat.
  3. Add the mushrooms and salt and pepper to taste. Simmer for 10 more minutes.

Amount Per Serving  Calories: 670 | Total Fat: 38.1g | Cholesterol: 170mg

*Mina's Suggestions/Notes*

- I prefer to use either chicken thighs or drum sticks because I don't like to fuss with deconstructing an entire chicken. If you're cooking for 2, use a pack of 4 thighs or 5 drumsticks for this recipe. 

- I ALWAYS use olive oil when I cook only because not only is it healthier, but its an opportunity to add extra flavour!

- I found that 2 cloves of garlic was nothing..I really like a lot of garlic so I used 3 good sized cloves.

- I also added a full can of tomato paste to help thicken the sauce and of course, add more flavour :)

- I always try to use fresh herbs if i have the opportunity, if you CAN use fresh herbs, use double the amount of dried (1 tsp)...dried works too though! 

- Speaking of herbs, I added some basil and 2 bay leaves (personal taste, not needed though)

- Where it asks for wine, I almost always use red wine when cooking with tomatoes. If you only have white, try it and let me know how it tastes..or if for whatever reason you don't have wine, I read one of the comments where a woman used apple juice instead of wine...but use at your own discretion. 

- I would like to mention that I pretty much doubled what the recipe called for in wine because I just like the taste of wine! I find that it adds a nice depth and richness.

- I really hate mushrooms and I'm not crazy for peppers so I just added a chopped carrot instead. If you do use mushrooms, they MUST be fresh. canned mushroom won't work the same because you want the fresh mushrooms to absorb all the yummy flavours on the sauce!

- And don't forget to add 1 tsp of sugar to your sauce to cut the acid...Nobody likes heartburn!! </3

Happy Eating! <3

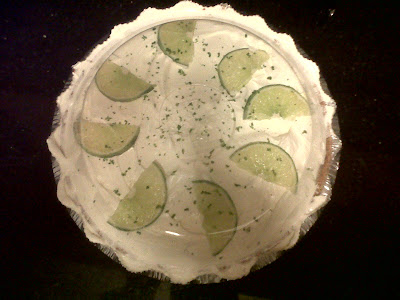
Key Lime Pie (SO Easy!)


So, some of you may know I'm quite the little homemaker ;) and I often make pies as well as cook at home most days of the week :) Well this is probably the easiest and most delicious key lime pie recipe you will EVER come across!!!

Ingredients

  • 5 egg yolks, beaten
  • 1 (14 ounce) can LOW FAT sweetened condensed milk
  • 1/2 cup key lime juice or 5-6 limes
  • 1 (9 inch) prepared graham cracker crust

Directions

  1. Preheat oven to 375 degrees F (190 degrees C).
  2. Combine the egg yolks, sweetened condensed milk and lime juice. Be sure to add the zest from all all but 1 lime into the mixture (use the mini grater side of your cheese grater) Mix well. Pour into unbaked graham cracker shell.
  3. Bake in preheated oven for 15 minutes. Allow to cool. Top with LOW FAT whipped topping and garnish with zest of remaining lime and slices if desired.

*Mina's Suggestions/Notes*

When I do bake, I always try to do so with low fat or fat free options. In something like this, you get enough fat and richness from the egg yolks that you won't taste a difference with low fat options... Just 
thought I'd mention it.  

- There's also no need for the lime zest or lime slices on top. Although I always add the zest of whatever citric fruit I'm cooking with, it really does take it to the next level in the flavor elevator. 

Happy Eating <3

Braised Duck Ragu

As some of you may know, I'm a huge fan on duck! I feel like it's the forgotten foul, only thought of in french or chinese cuisine. But this wickedly awesome (and easy) recipe was found on ChubbyHubby and it's been a favorite ever since!
------------------------------------------------------------------


BRASATO D`ANATRA
Chef Roberto Galetti’s Braised Duck Sauce

500 gr celery, julienne
500gr carrots, julienne
500 gr onion, julienne
3 kg duck legs
1kg whole peeled tomatoes
1 btl red wine
500 ml vegetable stock
5 bay leaves

In a big pot, sauté the vegetables with olive oil. Meanwhile flour the duck legs and then pan-fry them until golden. Put the duck legs into the pot together with the vegetables. Then add the wine, the bay leaves, and the peeled tomato. Crush the tomatoes into the pot with your hands. Pour in the vegetable stock and bring everything to a boil. As soon as it boils, lower the heat, cover and simmer for 2 hours.
After 2 hours, separate the meat from the sauce. Remove excess fat and skin. Then debone the duck legs, mixing the meat back into the vegetables and sauce. Leave to rest.
Cook your noodles. Then reheat a portion of the sauce in a pan with butter, black pepper, and salt. Add some of the boiled/cooked noodles and toss. Sprinkle Parmesan cheese and parsley over the pasta and serve immediately.

*Mina's Suggestions/Notes*

- 500 gr = 2 cups (Although, I only use 1 cup of each vegetable)
- I also suggest finely chopping instead of julienne because I'm kind of lazy, lol
- I also found that 1 bottle of red wine is WAY too much, I personally use just less then half, and save the rest of drinking, but you should eye ball it..
- and I prefer chicken stock to vegetable stock

Happy Eating! <3

p.s.

I'll be sure to take some photos of each step and add them for you next time I make it

First Post!

Most of you probably know me from my other blog, minastefan.com, but this will be nothing sexy..well, it will be sexy, but the food kind of sexy where I talk about my favorite dishes, restaurant reviews and pretty much anything else to do with food.

I encourage you guys to post comments, ask questions, and even submit your own recipes :)

Please bare with me as it will take me a short while to get everything sorted out with additional links, recipes added, etc.

but of course, I'll be posting whenever I make an update on my personal twitter, @MinaStefan

Happy Eating <3